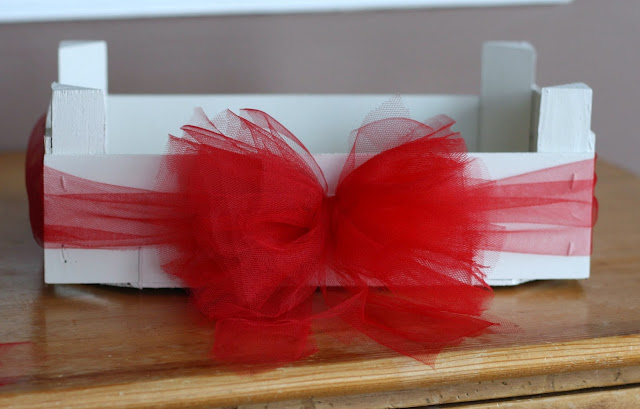
Beyond all the usual wonderful and festive things Christmas brings, it's also the marvelous season of citrus! 'Tis the season of crates filled with juicy, sweet, easy to peel clementines. It seems a shame to throw out those cute clementine crates, so I got crafty and made a fabulous gift box. This project may be a bit more involved then sponging with some gingerbread men, but it's a beautiful way to package your homemade kitchen goodies this Christmas. Bonus: once the goodies are gone, the box can be used again. This little box is headed to my in-laws. Shhhhhh don't tell them!
If your last minute Christmas list is still miles long (t-minus five days...eeek!), then set your crate aside for a great snowy day project when the chaos has subsided. You can always change up the colors scheme and use the crate in your home year round as a mail sorter, mitten/hat holder, or random catch-all crate. Let's get crafting!
Step one: Thoroughly enjoy a crate of clementines ;)
Step two: Tear off any removable packaging/labels and remove any remaining glue that will easily come off.

Step three: Sand any rough edges and any remaining glue down with a fine grit sandpaper. Don't worry too much about the glue (that's what the finishing ribbon is added to cover).
Step four: Wipe away any sanding debris and paint in a festive color or a basic white. I used some leftover white from our rustic dresser project. Paint the two long sides, any visible edges, and the inside. I applied three coats of paint on the outside and two on the inside. Most likely your box will also need at least two coats of paint because the crates are typically made of raw wood.
Step five: If your crate is like mine, the two smaller sides have the clementine company information printed directly on the wood. There's a couple of things you could do about this: leave it as is, distress it a bit and make it look like an vintage advertising piece, cover it up with the same or a darker color paint, or mod podge a piece of heavy weight paper on to it. I found the paper I used in the scrapbook section at Michaels. It has a faux wood grain and a slight gold sheen - perfect for Christmas.
Position the paper on the crate and smooth any wrinkles with a roller. You could just use your hands, but the roller helps to make sure the paper and crate stick well. Be careful that the crate staples don't poke through your paper. Once you have applied the paper to both ends of the crate, allow it to dry. Once it's dry you can then apply a sealant or acrylic coating.
Step six: Now it's time to get fancy with ribbon. I tried in vain to find a bow that would work with my vision for the box. Alas, it was too close to Christmas and the only ones I found were much too large. I decided to use red tulle instead, but I think for my next box I'll try a colored raffia.
Tie a length of ribbon around the box. If you'd like, you could hot glue it in the corners to hold it there. I left mine unglued so the look of the box can be changed in the future.
I then made a tulle pom bow using this tutorial and tied it to the other tulle wrapped around the crate.
Add a pick of festive gold berries and ta da! Done!
Wondering about what's in the crate? I bought the jars at Home Goods and fill them with homemade snowflake marshmallows and hot chocolate mix. If you decide to follow the marshmallow recipe, I spread my marshmallow mixture in a prepared jelly roll pan (not a 9x13). I found it was easier to cut the marshmallows with the cookie cutter when it was spread a little thinner. If you want more of my thoughts on homemade marshmallows, visit this post. Here's a glimpse into the messy, "snowy" process...
And the hot chocolate mix? After some delicious taste testing, the hubster and I decided we liked the milk chocolate flavor over the semi-sweet. If you'd like to try my version, I used 2 3/4 c. milk chocolate chips and 1/2 c. semi-sweet chips. Be prepared - this is the real deal! The mix combined with hot milk makes a rich, creamy, and thick drink perfect for a chilly night. Topped with a snowflake marshmallow - pure happiness in a cup :)
Hot chocolate and marshmallows too standard for you? Here's a few other homemade goodies that I think would be perfectly wonderful stuffed in a clementine crate: dark chocolate bark, espresso truffles, fudge (please ignore the ugly night photos in that one...), or almond oatmeal lace cookies. Ahem...shameless plugs ;)
Package your crate (I used shrinkable cellophane and yes the bow got squashed, but it just needs a bit of fluffing) filled with everything yummy and place it under the tree...there it must wait for just a few more days. Hope these last few days are filled with everything festive, wonderful, and lovely for you and yours!
P.S. Check out other festive projects at the Link Party Palooza and The Party Bunch!


Your marshmallows look amazing! I love homemade marshmallows but I haven't had luck with using cookie cutters.
ReplyDeleteThanks! We do too - wayyyy better than store bought! I haven't in the past either, but pouring it in a jelly roll pan so it's a little thinner helped and pressing down pretty hard.
ReplyDeleteLovely idea as gift boxes can be kept for attractive and fairly storage space.
ReplyDeleteThank you!
ReplyDelete