Sunday, December 29, 2013

the festivities

It's been a week of pure Christmas joy! Full of family, friends, food, fun, and love! Here's the festive highlights:
this cookie recipe - I'd recommend rolling them out thick and pulling them out of the oven after 12 minutes for a chewy graham cookie
an unseasonable warm night to catch the Christmas lights
woah! a true gingerbread house artist!
Mom's famous gingerbread
paper rose template found at this fabulous craft blog
Christmas morn'
a brilliant Christmas sunset
world domination - family settler's style :)
celebrating at The Melting Pot!
Hope yours was just as beautiful, bright, and blessed! 

Friday, December 20, 2013

clementine crate turned gift box

Beyond all the usual wonderful and festive things Christmas brings, it's also the marvelous season of citrus! 'Tis the season of crates filled with juicy, sweet, easy to peel clementines. It seems a shame to throw out those cute clementine crates, so I got crafty and made a fabulous gift box. This project may be a bit more involved then sponging with some gingerbread men, but it's a beautiful way to package your homemade kitchen goodies this Christmas. Bonus: once the goodies are gone, the box can be used again. This little box is headed to my in-laws. Shhhhhh don't tell them!  

If your last minute Christmas list is still miles long (t-minus five days...eeek!), then set your crate aside for a great snowy day project when the chaos has subsided. You can always change up the colors scheme and use the crate in your home year round as a mail sorter, mitten/hat holder, or random catch-all crate. Let's get crafting!

Step one: Thoroughly enjoy a crate of clementines ;) 

Step two: Tear off any removable packaging/labels and remove any remaining glue that will easily come off.
Step three: Sand any rough edges and any remaining glue down with a fine grit sandpaper. Don't worry too much about the glue (that's what the finishing ribbon is added to cover).

Step four: Wipe away any sanding debris and paint in a festive color or a basic white. I used some leftover white from our rustic dresser project. Paint the two long sides, any visible edges, and the inside. I applied three coats of paint on the outside and two on the inside. Most likely your box will also need at least two coats of paint because the crates are typically made of raw wood.
Step five: If your crate is like mine, the two smaller sides have the clementine company information printed directly on the wood. There's a couple of things you could do about this: leave it as is, distress it a bit and make it look like an vintage advertising piece, cover it up with the same or a darker color paint, or mod podge a piece of heavy weight paper on to it. I found the paper I used in the scrapbook section at Michaels. It has a faux wood grain and a slight gold sheen - perfect for Christmas. 

First, measure the sides and cut carefully. Then apply mod podge with a foam brush on to the side of the crate and the back of the paper. Don't skimp on the mod podge or it might not stick.
Position the paper on the crate and smooth any wrinkles with a roller. You could just use your hands, but the roller helps to make sure the paper and crate stick well. Be careful that the crate staples don't poke through your paper. Once you have applied the paper to both ends of the crate, allow it to dry. Once it's dry you can then apply a sealant or acrylic coating.
Step six: Now it's time to get fancy with ribbon. I tried in vain to find a bow that would work with my vision for the box. Alas, it was too close to Christmas and the only ones I found were much too large. I decided to use red tulle instead, but I think for my next box I'll try a colored raffia.

Tie a length of ribbon around the box. If you'd like, you could hot glue it in the corners to hold it there. I left mine unglued so the look of the box can be changed in the future.
I then made a tulle pom bow using this tutorial and tied it to the other tulle wrapped around the crate.
Add a pick of festive gold berries and ta da! Done!
Wondering about what's in the crate? I bought the jars at Home Goods and fill them with homemade snowflake marshmallows and hot chocolate mix. If you decide to follow the marshmallow recipe, I spread my marshmallow mixture in a prepared jelly roll pan (not a 9x13). I found it was easier to cut the marshmallows with the cookie cutter when it was spread a little thinner. If you want more of my thoughts on homemade marshmallows, visit this post. Here's a glimpse into the messy, "snowy" process...
And the hot chocolate mix? After some delicious taste testing, the hubster and I decided we liked the milk chocolate flavor over the semi-sweet. If you'd like to try my version, I used 2 3/4 c. milk chocolate chips and 1/2 c. semi-sweet chips. Be prepared - this is the real deal! The mix combined with hot milk makes a rich, creamy, and thick drink perfect for a chilly night. Topped with a snowflake marshmallow - pure happiness in a cup :)
Hot chocolate and marshmallows too standard for you? Here's a few other homemade goodies that I think would be perfectly wonderful stuffed in a clementine crate: dark chocolate bark,
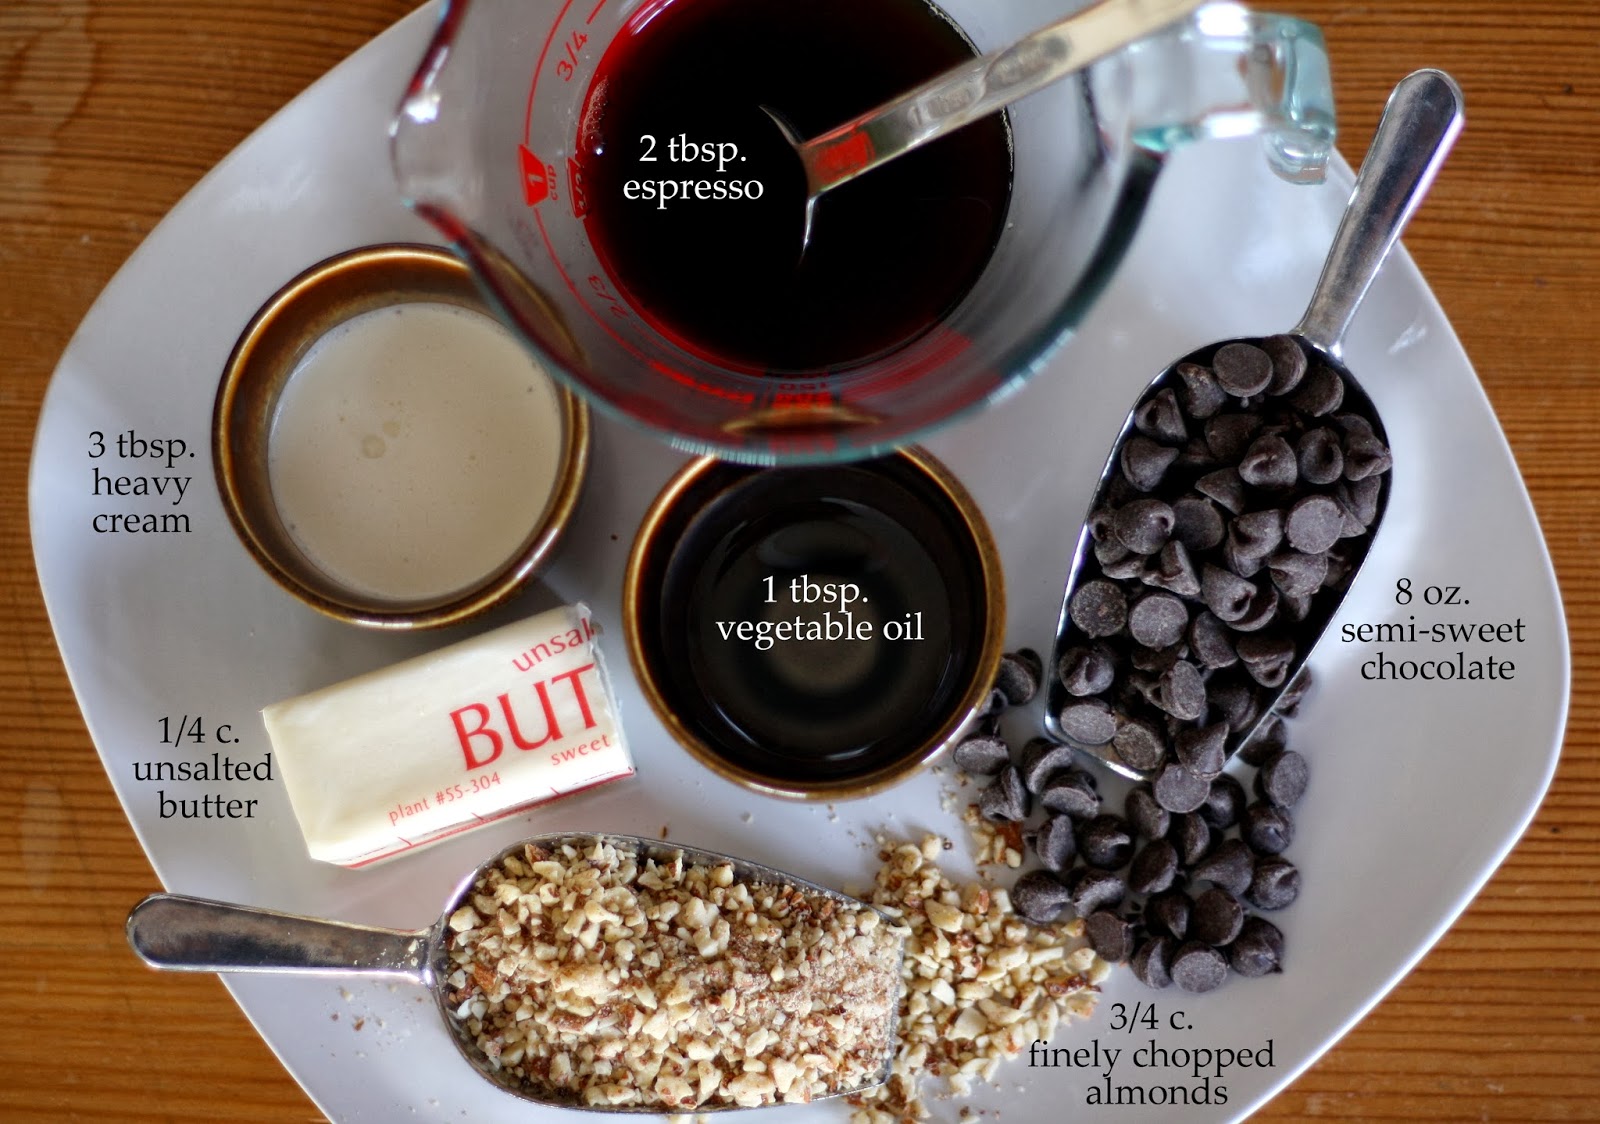
 espresso trufflesfudge (please ignore the ugly night photos in that one...), or almond oatmeal lace cookies. Ahem...shameless plugs ;)
Package your crate (I used shrinkable cellophane and yes the bow got squashed, but it just needs a bit of fluffing) filled with everything yummy and place it under the tree...there it must wait for just a few more days. Hope these last few days are filled with everything festive, wonderful, and lovely for you and yours!
P.S. Check out other festive projects at the Link Party Palooza and The Party Bunch!

Monday, December 16, 2013

chocolate espresso truffles

Last year I made about half a dozen batches of chocolate orange truffles for gifts, parties, and snacking during Christmastime. They were quite a hit! Most people think chocolates truffles are too difficult to attempt at home and should be left to professional chocolatiers, but truly truffles are quite easy to make. You just need a little bit of time, a willingness to get a little messy, and a love of chocolate!

If you've been reading, you might recall that the classic chocolate/coffee flavor pairing is a beloved combination in our family. I decided it was time to recreate espresso brownies in a chocolate truffle form. These truffles are rich and decadent spheres that will make your chocoholic/coffeeholic loved ones giddy.
Chocolate Espresso Truffles 
Adapted from All-recipes
Makes 20-24 truffles

Ingredients
1/4 c. unsalted butter
3 tbsp. heavy cream
4 oz semisweet chocolate
2 tbsp prepared espresso
3/4 tsp. espresso powder 
4 oz semisweet chocolate
1 tbsp vegetable oil
3/4 c. finely chopped almonds or hazelnuts

Directions
1. Combine butter and cream in a saucepan over medium high heat. Bring to a boil then remove from heat.
2. Stir in 4 oz chocolate, prepared espresso, and espresso powder. Stir until mixture is smooth. Note: I made a batch of these truffles with only the prepared espresso, but the additional flavor from the espresso powder is needed to pack an espresso kick into the truffles.
3. Pour truffle mixture into a parchment lined 9 x 5 loaf pan. Chill for about 2 hours until firm.

4. Line a baking sheet with parchment or waxed paper. Here's part I of truffle making messiness: shape truffle mixture into rounded teaspoon with hands. No matter what you will have chocolate on your hands afterwards, but if the chocolate begins to majorly melt than you might need to stop and re-chill the truffle mixture. Place on baking sheet and chill in freezer for about 30 minutes. The last few truffles are usually the most oddly shaped of the bunch, I sometimes go back and roll those into better balls after they have been in the freezer.
5. While the truffles are in the freezer, toast the almonds. I prefer to toast in a skillet on medium heat stirring and shaking often until the nuts brown slightly and give off a nutty smell. You can also toast in the oven, but I think it's easier to make sure they don't burn when they are on the stove top (especially if you don't have a window on your oven door).

6. In a double broiler, melt remaining 4oz. chocolate with oil. Stir until smooth and let cool slightly (you don't want the outer layer to melt your truffle center).

7. Drop truffles in the melted chocolate. Use two forks (or a toothpick) to lift the truffles out. Allow any excess chocolate to drip off.
8. Drop the chocolate coated truffles in the toasted nuts and roll around until the melted chocolate is completely coated. Then carefully transfer back onto baking sheet. Repeat with remaining truffles.
9. Chill to set outer chocolate shell. Homemade truffles keep best in an air-tight container in the fridge. Set the truffles at room temperature about a half hour prior to serving.
Make these espresso truffles for your next Christmas party or give these out as gifts. I doubt you'll get any complaints when you show up these beauties! Never doubt the power of chocolate and coffee. Never.

Sunday, December 15, 2013

news from the book nook: Christmas stories

This edition of news from the book nook is filled with Christmas cheer. If you're new here, check out this post to see what this series is all about (and thanks for stopping by!).
Christmas Eve was always one of the best days of the year. The anticipation. The preparation. The quiet. The love. The candlelight. And the day we received an early Christmas present - a new family Christmas story book. Through the years, we've accumulated quite a collection. It's always fun to pull at the box of books each season and read through some of our favorites. Wondering what they are? I've included some of my favorites in this blog post. Hope you find a new festive favorite for your family!

Santa Claus and His Elves by Mauri Kunnas
This book holds a special place in my heart. Hands down one of my favorite children's books of all time. If you've ever wondered what life is like for Santa and his hardworking elves - wonder no more. Beautiful, intricate illustrations and a magical story of life at the North Pole make this perhaps the best book about Santa of all time!
Gingerbread Baby by Jan Brett
I mentioned before that gingerbread men are beloved in my family. Jan Brett's rendition of the classic gingerbread man story is a favorite. My preschoolers loved this book so much so that we read it everyday for a week.

Great Joy by Kate Dicamillo and illustrated by Bagram Ibatouline
A inspiring story of how one little girl shares the Joy of Christmas with those in need.

The Night Before Christmas originally by Clement Clarke Moore
Such a classic! In my family, my dad still reads this one aloud before we head to bed Christmas Eve. Some childhood traditions are just too good not to continue. The copy we have is "an exact reprint of an early edition" which basically means it has vintage illustrations and type. I love the oldness of the edition, but I've seen some newer versions that look just as magical.

The Polar Express by Chris Van Allsburg
Like most things, the book is wayyyyy better than the movie! This is one of those rare children's books that captures the magic of childhood and believing in both words and illustrations. We read this one aloud as a family too!

The Jolly Christmas Postman by Janet and Allan Ahlberg
This book is a sequel to The Jolly Postman and is filled with Christmas cards and letters to Red Riding Hood, Humpty Dumpty, and other favorite fairy tale characters. The story ends with a trip to the North Pole to deliver some children's letters and there may even be a special one for the postman too!

Silver Packages: An Appalachian Christmas Story by Cynthia Rylant and illustrated by Chris Soentpiet
A beautiful story of a Christmas train that comes through the mountains with a man who brings silver package Christmas gifts for the children. One boy, Frankie, wants one specific thing every year that he never receives. When Frankie is older he realizes he was given just what he needed each Christmas.

How the Grinch Stole Christmas by Dr. Seuss
No Christmas book list would be complete without the Grinch. "Maybe Christmas, he thought, doesn't come from a store. Maybe Christmas....perhaps...means a little bit more!" P.S. I highly recommend the illustrated movie too!

Of course, the best story of all is the true story of Christmas which far exceeds anything Santa could write or give. As the angel told the shepherds,
"Do not be afraid; for behold, I bring you good news of great joy which will be for all the people; for today in the city of David there has been born for you a Savior, who is Christ the Lord.This will be a sign for you: you will find a baby wrapped in cloths and lying in a manger.” And suddenly there appeared with the angel a multitude of the heavenly host praising God and saying, Glory to God in the highest, And on earth peace among men with whom He is pleased.”  ~ Luke 2:10-14

Merry Christmas, friends!
Oh, if you are wondering when we got a cat, we didn't. We happened to be snowed/iced in at my parent's this morning and Pockets was helping with the photo shoot. He a sneaky cat masquerading as a children's book lover.

Thursday, December 12, 2013

diy Christmas wrap: sponge painting

It's probably no surprise to you that I am a lover of all things paper. Cards...tags...gift wrap...as long as it's made of paper and cute I'm happy. Of course, paper is expensive. Quality wrapping paper can cost more than a couple bucks. Beautiful cards are easily four dollars a pop. Gorgeous tags for all those gifts under the tree can add up.

So I thought I'd share some diy gift wrapping triumphs and frugalish Christmas wrapping tips that allow me to spend less and save more this season. Today let's talk about hand stamping or sponging our wrapping paper.

The key to being creative and frugalish with your gift wrap is to use ordinary objects in new ways. I created snowflake gift wrap with a few cheap snowflake ornaments I bought at Target during their end of the season clearance last year. 
Fast forward 11 months and here's the same snowflakes getting a workout making pretty snowflake shapes on white paper. If you're looking to get the same look, I saw some similar snowflake ornaments at the dollar store the other day. 
Embrace the imperfections of hand stamping - that's what makes the finished product unique! If you'd like to try the snowflake technique, I'd recommend using a sponge paintbrush to apply the paint to the snowflakes. P.S. I bought my roll of newsprint at Ikea last year (and it's still going strong!), but some newspapers give the end of their roll away for free. 

If you have some plain sponges and cookie cutters lying around, try sponge painting your gift wrap. I pressed a cookie cutter into an unused kitchen sponge and then cut along the lines to create the tree-shaped sponge. I added some gold paint to the green to give the trees a little Christmas cheer.
After the trees dried, I painted a few festive "cranberry strands" with the end of a small paintbrush dipped in red acrylic paint.
Please excuse the green-tinted fingers...:)

Or perhaps you'd like to go the gingerbread man route. My mom's gingerbread men have a bit of a cult following among our family and friends. People come out of the woodwork on baking day. A request for a plate of gingerbread men has even been known to be listed on Christmas lists. Moral of the story: gingerbread men are celebrated in our family, so I thought I'd continue the celebration with some whimsical gingerbread men sponge painting. 
My frugalish tip for eliminating the need for gift tags: sponge paint monograms on the presents. It's also a great way to help the little ones learn the first letter of their names. If you don't own any letter stencils, print your own on cardstock or get fancy and paint your own curvy monogram letters. 
Raid the craft store's clearance ribbon bins or pick up some festive ribbon at the dollar store to add the finishing touch to your gifts. 
Happy wrapping! More diy Christmas gift wrap ideas coming your way in the next few days. Until then check out other fabulous projects at The Party BunchLink Party Palooza, and Made By You Monday!

Thursday, December 5, 2013

an honest word about Christmas

It's finally time for us to talk about all things Christmas! Oh Christmastime - my most favorite season!  The celebration of Jesus's birth, the cozy, the sweet, the gatherings, the laughter, the music, the smells... It only lasts for a month, therefore, we must cram as much Christmas loveliness into the days as possible. And by cram, I do not mean almost running another over on your way to find last minute gifts for every person you've ever known. Nor do I mean throwing your budget out the window all in the name of Christmas.

Instead, let's change the way we think, speak, and act about Christmas. Let's make it more about Christ and less about the masses/us. Let's make it more about giving than receiving. More about loving and living than wanting and needing. My Christmas prayer for us is that we would not forget the true Reason for this season. May we be the Linuses of this world reminding others what Christmas is truly about.

Now don't think I've gone all crazy on you. I'll still be giving gifts, making sweets, and sharing some of my frugalish ideas here too. I just don't want to let the perpetual "list" ruin my joy and divert my focus this Christmas. I hope you'll join me in seeking to live the line of the famous carol this Christmas: "sweet hymns of joy in grateful chorus raise we. Let all within us praise His holy name!"

With much love this Christmas!
Caitlin

Thursday, November 21, 2013

a list of loves and links

Because my life this week is consumed  with shoeboxes through this incredible ministry, I've gathered a bunch of my favorite links lately and few other random things that have caught my eye. Happy browsing!

I know summer is behind us, but this one-pan farro with tomatoes recipe from Smitten Kitchen is simply delicious. After thirty minutes in the pot, the ingredients transform into an almost risotto-like goodness that is perfect for cold winter evenings. This is one my newest go-to recipes for easy, quick, and comforting dinners. (P.S. cut the red pepper flakes if you don't do heat.) Speaking of Smitten Kitchen, these cranberry orange breakfast rolls are on my list of sweet things to make and SOON!

Current favorite diy blog: East Coast Creative. What these ladies can do with tiny budgets is magical! Watch their show and prepare to be amazed. My personal favorites thus far from the show: the rolling barn door, the pallet wood accent wall, and this little kitchen re-do. Truly gifted designers.

Meet Grandma Helen. Yes, that is her name. Quite possibly one of the silliest cows I've ever seen. Check out that curly mop up on top and those giant ears. She wants to know if you have a carrot in your pocket...

Marriage is work, beauty, sacrifice, and love all rolled together in a messy, precious package! This article reminds me of how thankful I am for my hubster.

Sugared cranberries?!? I feel like I've missed something so important for much much too long. It's time to change that.

Gearing up for Christmas goodness! Get ready - I've got some Christmasy posts in the works. Here's a little sneak peek:

Just got PW's newest cookbook from the library! Can't wait to read through all the recipes and check out Charlie's costumes :)

Excited for more Joy the Baker's Bonkers Awesome videos - pretty sure I'd make the same faces if I was covering a wedding cake with fondant!

And while we're on the subject of baking, leave it to the good people at King Arthur Flour to have some great baking tips. A reusable shower cap to cover rising dough - genius!

I leave you with this beautiful sight of what almost landed on our car last weekend...
Pretty cool, huh?

Thursday, November 14, 2013

butternut squash, feta, and sage galette


The flavors of fall are in full swing here in the abode. A couple of weeks ago that meant the smell of pumpkin filled every nook and cranny. But now, I've mostly transitioned to apples, cranberries, sweet potatoes, pomegranates, and squash. Today let's focus on that perfect little fall-flavored starch: butternut squash.

I recently discovered a versatile galette recipe in the Everyday Food Light cookbook. Are you familiar with galettes? Basically a rustic free-form tart that can be made savory or sweet. The galette dough in this recipe uses olive oil instead of butter (less saturated fat), comes together in a bowl in a minute and half, and is basically a blank canvas. Quite possibly the easiest dough ever. With perhaps the exception of Bisquick, but I'm not completely sure that counts.


The original recipe uses broccolini and feta. I kept the dough the same, but changed the filling to include roasted butternut squash, feta, parmesan, and a few of the last waning sage leaves from the garden. A dash of cayenne and some cracked pepper help give the galette some additional peppiness. The result? Sweet, savory, fall-inspired goodness! Let's crack open that squash!


Butternut Squash, Feta, and Sage Galette
Adapted from Everyday Food Light

Ingredients
For the dough:
2 cups all purpose flour
1/4 c. olive oil
1/3 c. cold water
1 tsp. salt

For the filling:
1/2 of a butternut squash (about a 1 1/2 lbs after peeled or the top neck part of the squash - save the bottom half for another day)
1 tbsp. olive oil
1/2 tsp salt
1/4 c. grated parmesan cheese
1/2 c. crumbled feta cheese
1 1/2 tsp. fresh finely chopped sage
dash of cayenne
ground pepper, to taste
1 egg, lightly beaten

Instructions
1. Preheat oven to 350 degrees.

2. Peel butternut squash and cut just where the neck begins to round (see photo).


3. Using a knife or mandolin, cut squash neck in half long ways and then cut into 1/4 inch thick semi-circles. Try to cut similar size pieces, otherwise, the squash will not roast evenly in the oven.

4. Toss squash pieces in olive oil and salt.

5. Spread the squash semi-circles out on two parchment lined or greased baking sheets and roast for about 20 minutes. You want the squash to be tender, but not mushy (mushy squash will fall apart during the galette assembly process). Once the squash is out of oven, raise the temperature to 400 degrees.

6. While the squash is roasting, prepare the galette dough by combining all the ingredients with a fork in a mixing bowl. Once the dough has comes together, knead for about a minute. Refrain from overkneading - the dough will loose its flakiness.

7. Cover the dough with plastic wrap and allow to rest in a bowl for 30 minutes.

8. Once the dough has rested, roll out on parchment into a 14 inch round. Transfer dough and parchment to a baking sheet.

9. Assembly the galette. First, sprinkle parmesan in the middle of the round leaving a 2 1/2 inch border on all sides. Then starting in the middle of the dough create a circular fan with the roasted squash. Then make another circle of squash overlaping the first (see photo). Sprinkle cayenne evenly across squash. Then spread feta and top with sage and ground pepper.


10. Fold dough border over filling and brush with beaten egg.


11. Bake in lower third of the oven for 35-40 minutes or until crust is golden brown. I prefer my galettes warm, but served at room temperature like a quiche works too.


Serve with a a spinach salad and call it dinner/lunch for four. Happy Cooking!


Need more butternut inspiration? Try Bon Appetit's florentini with butternut squash, Smitten Kitchen's butternut squash and caramelized onion galette, How Sweet It Is's butternut squash enchiladas or Love & Olive Oil's butternut squash risotto. All deliciously lovely options! Or check out Mouthwatering Mondays hosted by Southern Fairytale!